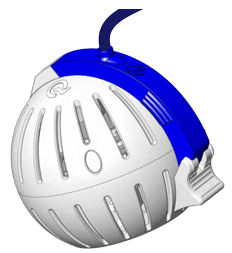
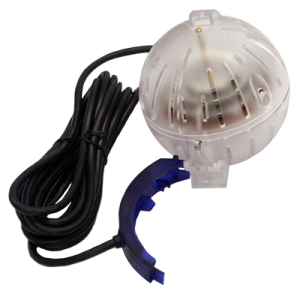
Posted on Leave a comment

ORB Assembly Guide


ORB Assembly Guide

The ORB Assembly is probably one of the most challenging for new beginners using the BEFE / QEnergySpa System. We are hopeful that the video and step-by-step instructions are helpful.  90% of the time, the orb assembly or cable are the problems with operation. Once you understand this, you will be quite happy to proceed with your QEnergySpa sessions.

Review the video demo of Orb Assembly below.

The QEnergySpa is a precise and fragile electronic piece of equipment.

It is similar in fragility to a computer. Because of its unique assembly, it is wise to assemble or disassemble in bright light. This will allow you to view the preciseness of each and every part prior to use.

It Helps To Be…

Careful. The care you take in the assembly or disassembly of these delicate precision instruments will preserve them for the years to come. All acrylic parts: Orb and on the cable and mohawk (part of the cable). Once you understand how fragile and precise the acrylic parts are, you will appreciate your patience spent on taking care of your QEnergySpa. It is also extremely important to assemble and disassemble DRY components. It’s easy to slip and mishandle the wet parts. They break easily. They are precise and made to fit perfectly.

Prior to Orb assembly or disassembly:

Visually inspect each part in bright light. Look for cracks or any broken pieces on all acrylic and metal parts. Check the cable to be sure that it has no cracks, cuts, or crimps. Check for any abrasion on the cable. Be sure to completely disassemble the orb shell. This includes removing the buttons in each orb shell. The buttons, (the metal disc with rod) sometimes comes apart. This can disrupt the conductivity, too.

ORB Assembly Guide Components:

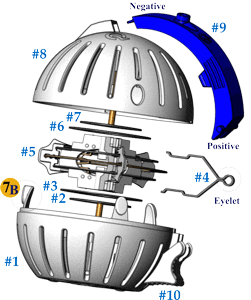
This diagram shows all the parts of the ORB Assembly and the corresponding number of each part. To avoid any misunderstanding,  please refer to these names and numbers when discussing the Orb assembly with your consultant.

ORB Assembly Details: Large Exploded orb assembly

  1. Bottom Orb Shell (Base)
  2. Bottom Button (Bottom Ring Assembly)
  3. Positive Ring (Sharp Edge facing UP)
  4. Positive Track
  5. Center Module (Copper & two Rings)
  6. Positive Ring (Sharp Edge facing DOWN)
  7. Top Button (Top Ring Assembly)
  8. Top Orb Shell
  9. Cable Connector (Mohawk)
  10. Locking clip


ORB Assembly Guide Step-by-step

Each step is noted here. Please see below for a step-by-step larger view.

QEnergySpa BEFE Footbath QEnergySpa BEFE Footbath QEnergySpa BEFE Footbath QEnergySpa BEFE Footbath
QEnergySpa BEFE Footbath QEnergySpa BEFE Footbath QEnergySpa BEFE Footbath QEnergySpa BEFE Footbath QEnergySpa BEFE Footbath


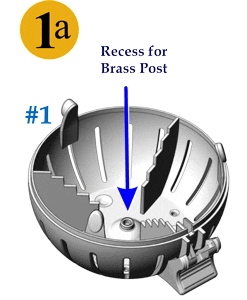
Step 1a. Begin with the Bottom Shell (Orb Base)

ORB Assembly shell Step 1a. Begin with the Bottom Shell


Step Explanations:
Begin the Assembly by taking the Bottom Orb Shell (#1).

Take note of the brass post recess as shown here.


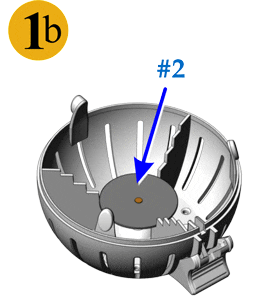
Step 1b. Insert the first Ring with Brass Post.

Install Button Step 1


Step Explanations:
Press the Bottom Button (#2) into the Bottom Orb Shell

with the Brass Post pointing down to fit into the recess.


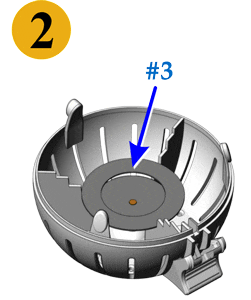
Step 2. Inserting the 2nd Ring.

Orb Assembly Step 2
Step Explanations:
Place one Positive Ring (#3) into the Orb Shell.

For optimal performance please ensure that the

less-rounded edge of the Positive Ring faces up.


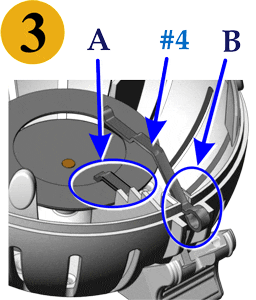
Step 3. Inserting the Positive Track.

Orb Assembly Step 3
Step Explanations:
Place the Positive Track (#4) into the Orb

Shell, resting on (A) the Positive Ring

and (B) the indent on the Orb Shell.


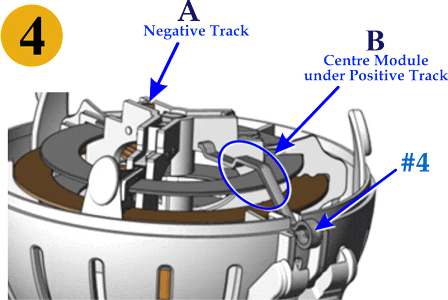
Step 4. Inserting the Center Module.

Orb Assembly Step 4
Step Explanations:
Fit the Center Module (#5) into the Orb Shell between the

Positive Track arms as shown, (B) ensuring that the Negative

Track (A) is directly opposite the Positive Track. The Center

Module (#5) should rest on the Bottom Button (#2) and be level within the Orb Shell.


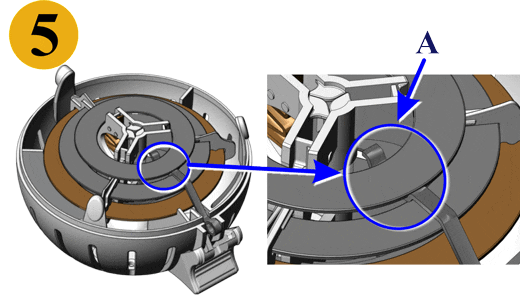
Step 5. Inserting the 2nd Positive Ring.

Orb Assembly Step 5
Step Explanations:
Place the remaining Positive Ring (#6) into the

Orb resting on top of the Positive Track (#4) as shown (A).

For optimal performance please ensure that the

less-rounded edge of the Positive Ring faces down.


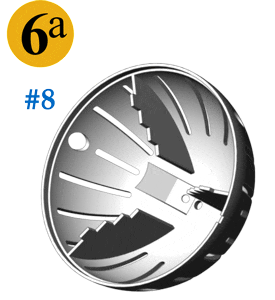
Step 6a.

Orb Assembly Step 6a
Step Explanations:

Take the Top Orb Shell (#8)

and locate the hole in the top.


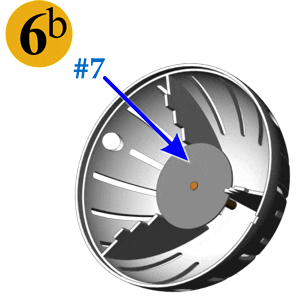
Step 6b. Inserting the Top Button.

Orb Assembly Step 6b
Step Explanations:
Insert the Top Button (#7) into the Top Orb Shell so that

the Brass Post protrudes through the hole. Gently rotate

it so that it goes in smoothly. It should hold in firmly.


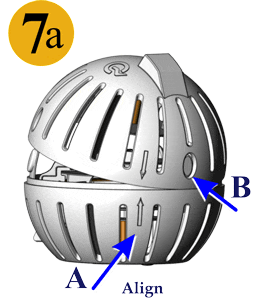
Step 7a. Fitting the Top Orb Shell.


Orb Assembly Step 7a
Step Explanations:
Align the arrows (A) on the rear of the Orb Shell.

When placed correctly, the Tab on the rear of the

Bottom Orb Shell (B) will match up with the Hole (B)

on the rear of the Top Orb Shell.


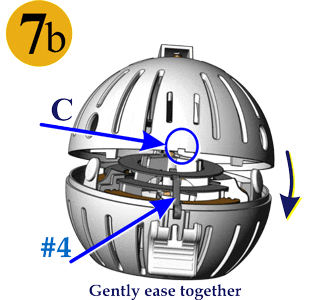
Step 7b. Closing the Top Orb Shell.

Orb Assembly Step 7b
Step Explanations:
Close the Top and Bottom Orb shells as if hinged at the back.

The small indent in the Top Shell (C) will align with the

Positive Track Eyelet (#4).


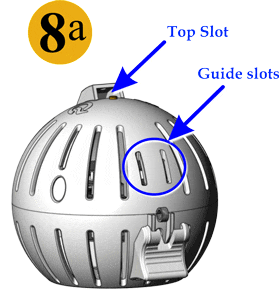
Step 8a. Locate Guide Slots.

Orb Assembly Step 8a
Step Explanations:

Locate the Guide Slots

and the Top Slot in the Orb.


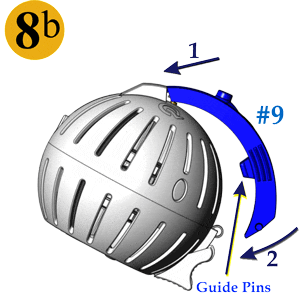
Step 8b. Fitting the Cable Connector.

Orb Assembly Step 8bStep Explanations:
Slide the tip of the Cable Connector (#9) into the Top Slot of the Orb.

Align the Guide Pins with the Guide Slots in the Orb and push the

Cable Connector firmly against the Orb.


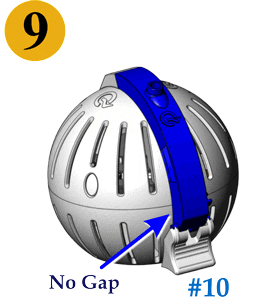
Step 9. Locking the Cable Connector in place.

Orb Assembly Step 9
Step Explanations:
Ensure that there is no gap between the Orb

and the Cable Connector. Whilst holding the

Cable Connector firmly against the Orb, slide

the Locking Clip (#10) upward fastening the

Cable Connector to the Orb.

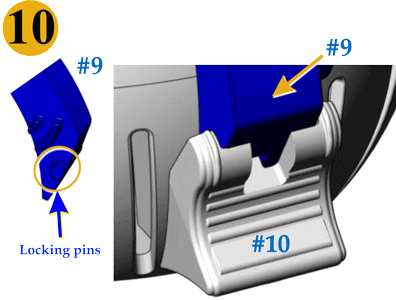
Step 10. Locking the Cable Connector in place.

Orb Assembly Step 10
Step Explanations:
Ensure the Locking Clip clicks

over the top of the Locking Pins

on the Cable Connector.


Your Orb is now complete.

Orb Assembly Step 11
Step Explanations:
Your Orb is now complete and ready

to begin a QEnergySpa session.


ORB Assembly Tip: Remember to never use force, and if in doubt, please call me.


Genuine QEnergySpa Parts | QEnergySpa Footbath
Orb Ring and Track Sets | How to “Q”
Orbs and Cables | Array Cables | Fuses
Display all QEnergySpa Products Look here.

You may always contact us with any questions or part requests. We are here to help you set up your session. Nothing looks and performs like a genuine QEnergySpa Footbath. For that reason, Pros insist on them. Do you need spare parts for your QEnergySpa Footbath? Does your orb or array have a broken or missing part also? Then you have found the right place. Q2Spa.com Online Since 2002

Genuine QEnergySpa Parts | Orbs and Cables
Fuses | Array Parts | Orb Ring and Track Sets

Solid, untreated, unvarnished copper tubs

The statements on this site have not been evaluated by the FDA.
These products are not intended to treat, cure, or prevent any disease.

Posted on Leave a comment

Replace Parts Rings Tracks or Cables

Replace parts – Rings, Tracks, or Cables?

Replace Parts: Worn rings and tracks

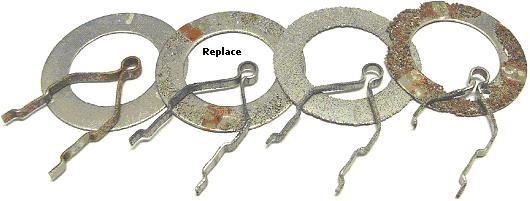
Replace Parts and regularly inspect the Rings and Track within the orb.

Replace parts such as the rings and track when visibly pitted. Especially when the edges are worn or thickness has been visibly affected. Note that the more corroded the Rings and Tracks become, the less effective they are. In the picture above, the second ring and track are at the stage at which we recommend that they should be replaced. Replace parts to keep your QEnergySpa running well.

Regularly inspect the Cable, too!


Replace Parts - Worn Cables
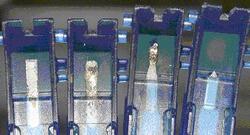
Examples: When to Replace Parts: Worn Cables


The second cable connector (Mohawk) from the left in the image shown, may require replacement. You should consider ordering a new cable at this stage. Don’t be tempted to add more conductive agents at this stage in order to get the required conductivity. If the connections are not adequate, the unit will not function correctly and will decrease the life of the Orb considerably. See additional tips here for TROUBLESHOOTING


Factors affecting the lifespan of the Orb:

The Rings and Tracks may generally last 10-100 Sessions.
The Orb and Cable are considered consumables and have a limited lifespan.

The factors affecting the lifespan include:

  • The frequency of use
  • The water source; bore, tank, or tap water. All these sources are continually changing conductivity. For example, your local water authorities are testing water supplies daily and adding the required chemicals depending on their results. Tank water changes depending on pollution levels.
  • Whether a ‘conductive agent’ has been added and what type. Potassium Citrate (Food Grade) causes less wear on the Rings and Track compared to salt. Adding more ‘conductive agent’ when not required, due to insufficient connections, will cause premature degradation of the Orb.
  • Length of time in the cleaning solution. Soak Orb components in the solution for a minimum amount of time.
  • Running the unit at higher settings may degrade the Rings and Track prematurely.
  • Environmental factors such as temperature, humidity, altitude, proximity to radio/microwaves, other power sources, and geographical and geological factors will affect the lifespan of the Orb while it is running.
  • The person having the session with the QEnergySpa.

HOW TO MAXIMIZE THE LIFESPAN OF Your Orb, Cable, and Power Supply 

Orb and CableRegularly, inspect the connections on the inside of the cable connector (the Mohawk) for oxidation and wear. Replace the Cable when visibly corroded and pitted. The more corroded the stainless steel cable connectors are, the softer they become, and hence the more likely they are to drop back and rest on the plastic. This can be remedied by inserting a small flathead screwdriver or handle of a teaspoon behind the plate and while holding the point where the connector is attached, easing it forward.

Only recommended as a last resort before ordering a replacement cable.

  • Run your unit at the recommended activity level.
  • Only add a conductive agent when absolutely necessary and then just enough in order for the unit to operate. Please note that after just one session with too much conductive agent added, the life of the Orb and cable will deteriorate rapidly.
  • When cleaning, soak metal components to remove lime, rust, and or scale. However, keep the time in the cleaning solution to a minimum.
  • Never polish or buff the Rings and Track, or center module with any product.
  • Never subject the Orb or Cable Connector to water temperatures higher than bearable to your skin. Do NOT clean the Orb in boiling water, a Dishwasher, or Autoclave.
  • Never file components in order to clean them. You may use a soft toothbrush or a soft plastic kitchen scour. Never scratch or dent the surfaces.
  • Always use the supplied carry bag for storage and transportation to avoid possible damage. Store in a dry, clean place. Be sure to unplug the cable from the Power Supply when not in use.
  • Place the unit away from foot traffic and other hazards while in use.

How To Maintain Good “Connections”

  • Inspect the Orb connections on a regular basis.
  • Pay particular attention to the pins located in the Cable Plug that attaches to the Power Supply. Ensure they have not been corroded, bent, or broken.
  • When the Cable is attached to the Orb, view through the side of the Mohawk to ensure firm connections with the Brass Rod protruding through the top of the Orb shell and the eyelet of the Positive Track on the side of the Orb. Also, ensure that you keep these connections clean and free from corrosion.
  • Ensure that the Positive Track makes a good connection with the Positive Rings.
  • For maximum efficiency, ensure that the Negative Copper Track (not the Copper Ring) connecting the two Negative Rings that form part of the Center Module, is sitting opposite the Positive Track. Refer to Step 4 of the Orb assembly guide.
  • Ensure that the Top and Bottom Buttons are intact and firmly attached to the Brass Rods. If not, replace it.

Are you ready to inquire more about a repair?
If so, please call me, Debbie Allen, at 319-208-1929

Ship all repairs to:

Q2Spa Repairs
2101 Dill St
Burlington, IA  52601


Q2Spa.com | Genuine QEnergySpa Parts | QEnergySpa Footbath

Orb Ring and Track Sets | Orbs and Cables | Array Cables

Fuses | QEnergySpa, BEFE Consumables | Support

Q2Spa| QEnergySpa Parts | Schedule a Session | Veggie Trials | BEFE Parts

Lastly, what is new at Q2Spa.com? Check out our Blog, look here.


The statements on this site have not been evaluated by the FDA.
These products are not intended to treat, diagnose, cure, or prevent any disease.
Posted on Leave a comment

QEnergySpa Comparison

Comparison:  Why do we have a variety of models to choose from?

We are proud to present the comparison of these innovative therapeutic models: q6000, q37, and q26. We will provide a comparison on the QEnergySpa based on Quantum Field Science and hence exact geometry, material, and specifically chosen electronic components. This is what makes this comparison so special. Utilizing an isolation transformer-based power supply that produces no electromagnetic interference or harmonic distortions. In addition, the Isolation Transformer is tested to safely withstand 4000 Volts.

Recharge Your Cells with the Best Foot Spa

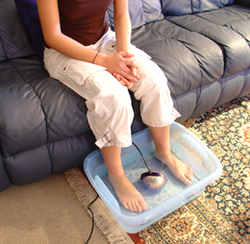
The QEnergySpa works through the medium of water by making available extra energy that living cells can utilize. There are a variety of different cells in the body. They all require water for hydration AND energy to perform at their optimum levels. With the depletion of either water OR energy, the cells are deprived and poor health can result. This is why the QEnergySpa is so beneficial. A footbath session keeps your cells healthy and energized. Users report that regular footbath sessions have improved their health and wellness. And a QEnergySpa footbath session doesn’t take a lot of time either, just 35 minutes every second or third day.

Let’s walk through the comparison details below.

This information is fairly simple to understand. The varieties of options and features of each model are available below. This is a unique single investment that the whole family can use, including your pets and plants. The BEFE QEnergySpa is designed and built to meet the International Electrical Safety Standard IEC60601.1. It is safe. The QEnergySpa has been used by many all over the world since 1997.

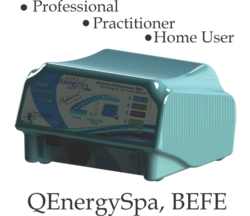
QEnergySpa Comparison QEnergySpa 6000 - Side ViewQ Energy Spa q6000 Pro QEnergySpa
– Built-in Automatic Timer
– Auto Power Level Select
– Automated System Diagnostics
– Superior Electrical Signal Clarity

Now being built.

 q37 Q Energy Spa BEFEq37 Home User Model
– Improved Electrical Signal Clarity
– Manual Power Level Select
– Separate timer

q26 Personal Use BEFE QEnergySpa Series
– Manual Power Level Select
– Separate timer

You Can…

  •     Look Younger
  •     Feel Better
  •     Have Better Concentration
  •     Increase Your Productivity
  •     Reduce Your Anxiety and Stress
  •     Elevate Your Energy Levels
  •     Have a Relaxed and Happier Life, Home, and Workplace

The benefit of Q2 is an advantage to all.

This Q2 BEFE foot bath is NOT a foot soaker massager. It is a true wellness session in a footbath. Try it now!  Please contact us with any questions about the comparison. First of all, Q2Spa.net has sold The ORIGINAL BEFE / Q Energy Spa Products online since 2002. Are you uncertain about what you need to keep your Orb, cable, or Q Machine running smoothly? No problem! We have all the parts you need to replenish your BEFE Q Energy Spa on our PARTS page here.

We have most items in stock.

Does your QEnergySpa have a broken or missing part? Then you have found the right place. First of all, we have all the parts to fit ALL BEFE and QEnergySpa models. In addition, the most asked-for parts include replacement rings and tracks, cables, orb parts, orb shells, and orb buttons. We also offer all services including warranty and repair. Q2Spa.com also offers Certified Used Models to meet almost every budget. You may see all the Q2Spa.com used models, Go here.

Lastly, what is new at Q2Spa.com? Check out our Blog, look here.

Q2Spa.com | Genuine QEnergySpa Parts | QEnergySpa Footbath | Orb Ring and Track Sets

Orbs and Cables | Array Cables | Fuses | Schedule Local Session: Look here.

Genuine QEnergySpa Parts| Orbs and Cables | Fuses| Array Parts | Orb Ring and Track Sets


The statements on this site have not been evaluated by the FDA. These products are not intended to treat, cure, or prevent any disease.