ORB Assembly Guide
The ORB Assembly is probably one of the most challenging for new beginners using the BEFE / QEnergySpa System. We are hopeful that the video and step-by-step instructions are helpful. 90% of the time, the orb assembly or cable are the problems with operation. Once you understand this, you will be quite happy to proceed with your QEnergySpa sessions.
Review the video demo of Orb Assembly below.
The QEnergySpa is a precise and fragile electronic piece of equipment.
It is similar in fragility to a computer. Because of its unique assembly, it is wise to assemble or disassemble in bright light. This will allow you to view the preciseness of each and every part prior to use.
It Helps To Be…
Careful. The care you take in the assembly or disassembly of these delicate precision instruments will preserve them for the years to come. All acrylic parts: Orb and on the cable and mohawk (part of the cable). Once you understand how fragile and precise the acrylic parts are, you will appreciate your patience spent on taking care of your QEnergySpa. It is also extremely important to assemble and disassemble DRY components. It’s easy to slip and mishandle the wet parts. They break easily. They are precise and made to fit perfectly.
Prior to Orb assembly or disassembly:
Visually inspect each part in bright light. Look for cracks or any broken pieces on all acrylic and metal parts. Check the cable to be sure that it has no cracks, cuts, or crimps. Check for any abrasion on the cable. Be sure to completely disassemble the orb shell. This includes removing the buttons in each orb shell. The buttons, (the metal disc with rod) sometimes comes apart. This can disrupt the conductivity, too.
ORB Assembly Guide Components:
This diagram shows all the parts of the ORB Assembly and the corresponding number of each part. To avoid any misunderstanding, please refer to these names and numbers when discussing the Orb assembly with your consultant.
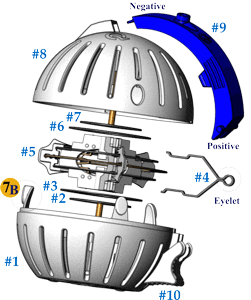
- Bottom Orb Shell (Base)
- Bottom Button (Bottom Ring Assembly)
- Positive Ring (Sharp Edge facing UP)
- Positive Track
- Center Module (Copper & two Rings)
- Positive Ring (Sharp Edge facing DOWN)
- Top Button (Top Ring Assembly)
- Top Orb Shell
- Cable Connector (Mohawk)
- Locking clip
ORB Assembly Guide Step-by-step
Each step is noted here. Please see below for a step-by-step larger view.


Step 1a. Begin with the Bottom Shell (Orb Base)
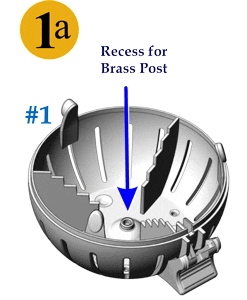
Step Explanations:
Begin the Assembly by taking the Bottom Orb Shell (#1).
Take note of the brass post recess as shown here.
Step 1b. Insert the first Ring with Brass Post.
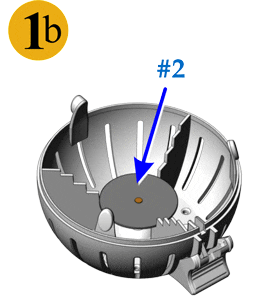
Step Explanations:
Press the Bottom Button (#2) into the Bottom Orb Shell
with the Brass Post pointing down to fit into the recess.
Step 2. Inserting the 2nd Ring.
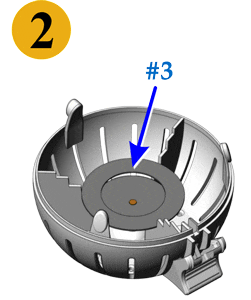
Step Explanations:
Place one Positive Ring (#3) into the Orb Shell.
For optimal performance please ensure that the
less-rounded edge of the Positive Ring faces up.
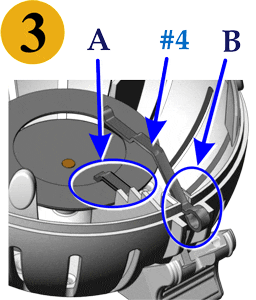
Step 3. Inserting the Positive Track.
Step Explanations:
Place the Positive Track (#4) into the Orb
Shell, resting on (A) the Positive Ring
and (B) the indent on the Orb Shell.
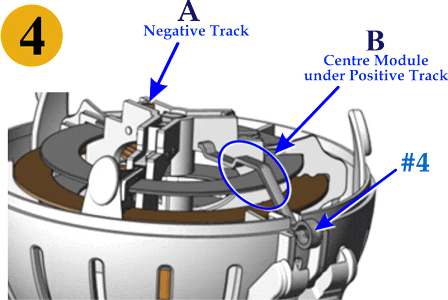
Step 4. Inserting the Center Module.
Step Explanations:
Fit the Center Module (#5) into the Orb Shell between the
Positive Track arms as shown, (B) ensuring that the Negative
Track (A) is directly opposite the Positive Track. The Center
Module (#5) should rest on the Bottom Button (#2) and be level within the Orb Shell.
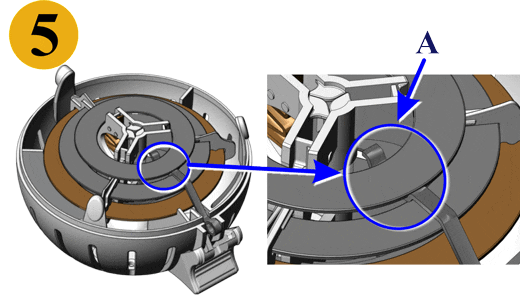
Step 5. Inserting the 2nd Positive Ring.
Step Explanations:
Place the remaining Positive Ring (#6) into the
Orb resting on top of the Positive Track (#4) as shown (A).
For optimal performance please ensure that the
less-rounded edge of the Positive Ring faces down.
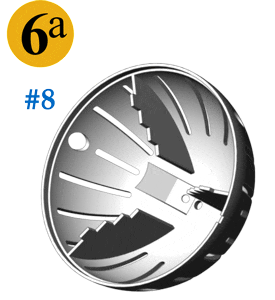
Step 6a.
Step Explanations:
Take the Top Orb Shell (#8)
and locate the hole in the top.
Step 6b. Inserting the Top Button.
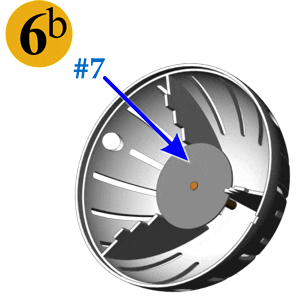
Step Explanations:
Insert the Top Button (#7) into the Top Orb Shell so that
the Brass Post protrudes through the hole. Gently rotate
it so that it goes in smoothly. It should hold in firmly.
Step 7a. Fitting the Top Orb Shell.
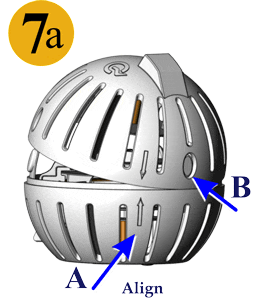
Step Explanations:
Align the arrows (A) on the rear of the Orb Shell.
When placed correctly, the Tab on the rear of the
Bottom Orb Shell (B) will match up with the Hole (B)
on the rear of the Top Orb Shell.
Step 7b. Closing the Top Orb Shell.
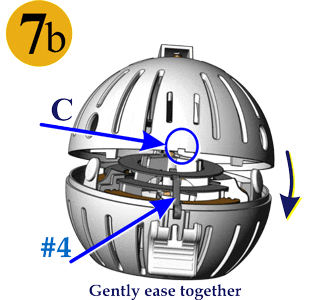
Step Explanations:
Close the Top and Bottom Orb shells as if hinged at the back.
The small indent in the Top Shell (C) will align with the
Positive Track Eyelet (#4).
Step 8a. Locate Guide Slots.
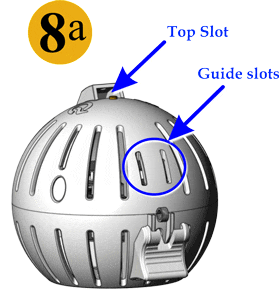
Step Explanations:
Locate the Guide Slots
and the Top Slot in the Orb.
Step 8b. Fitting the Cable Connector.
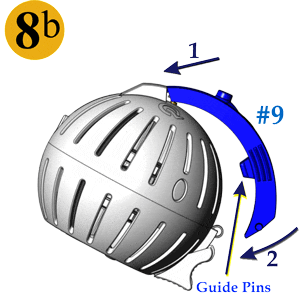 Step Explanations:
Slide the tip of the Cable Connector (#9) into the Top Slot of the Orb.
Align the Guide Pins with the Guide Slots in the Orb and push the
Cable Connector firmly against the Orb.
Step 9. Locking the Cable Connector in place.
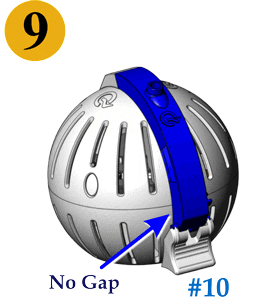
Step Explanations:
Ensure that there is no gap between the Orb
and the Cable Connector. Whilst holding the
Cable Connector firmly against the Orb, slide
the Locking Clip (#10) upward fastening the
Cable Connector to the Orb.
Step 10. Locking the Cable Connector in place.
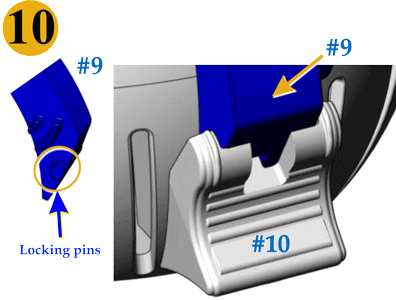
Step Explanations:
Ensure the Locking Clip clicks
over the top of the Locking Pins
on the Cable Connector.
Your Orb is now complete.
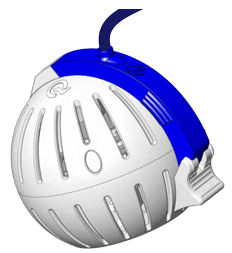
Step Explanations:
Your Orb is now complete and ready
to begin a QEnergySpa session.
ORB Assembly Tip: Remember to never use force, and if in doubt, please call me.
Genuine QEnergySpa Parts | QEnergySpa Footbath
Orb Ring and Track Sets | How to “Q”
Orbs and Cables | Array Cables | Fuses
Display all QEnergySpa Products Look here.
You may always contact us with any questions or part requests. We are here to help you set up your session. Nothing looks and performs like a genuine QEnergySpa Footbath. For that reason, Pros insist on them. Do you need spare parts for your QEnergySpa Footbath? Does your orb or array have a broken or missing part also? Then you have found the right place. Q2Spa.com Online Since 2002
Genuine QEnergySpa Parts | Orbs and Cables
Fuses | Array Parts | Orb Ring and Track Sets
Solid, untreated, unvarnished copper tubs
The statements on this site have not been evaluated by the FDA.
These products are not intended to treat, cure, or prevent any disease.